#131804  by vwjodyme
 
Anyone try those build your own Carvin's for an Alligator? Or is it best to go the Warmoth/eBay route?
 #131805  by strumminsix
 
vwjodyme wrote:Anyone try those build your own Carvin's for an Alligator? Or is it best to go the Warmoth/eBay route?
Craigslist. Swap out the pups, add a Stratoblaster, add stickers from eBay, add a few springs and screw down the trem and you are good with a Version1.

Can't think of a more budget way to go then that. Lots of upgrade routes from there but they can get more costly....
 #131813  by vwjodyme
 
Good thoughts strum. I was just thinking the carvin might be higher quality than a mim strat. Plus they offer it in swamp ash vs fenders regular ash.
 #131868  by FrettyBoy
 
strumminsix wrote:
vwjodyme wrote:Anyone try those build your own Carvin's for an Alligator? Or is it best to go the Warmoth/eBay route?
Craigslist. Swap out the pups, add a Stratoblaster, add stickers from eBay, add a few springs and screw down the trem and you are good with a Version1.

Can't think of a more budget way to go then that. Lots of upgrade routes from there but they can get more costly....
Good advise from Stumminsix! I just did pretty much this. I had a natural MIM Strat that I didn't really bond with due to the neck. It was a thin rosewood. In buying a Strat body from a guy over at TDPRI for another project, he offered me a Warmoth Vintage Modern Boatneck in maple for a good additional price. I immedialtely thought "this will make that natural Strat AWESOME". Which it did. I had already put Fender 57/62s in it as they're my fave anyway. So, then I started thinking ALLIGATOR! I got a Fender gold anodized pickguard, cut the lower portion where Jerry had the brass and cut the same piece off my w/b/w guard. I always block the trem, so that was done. i bought the knobs from Newark Electronics, the stickers of Ebay. Now I have a Strat in "pretty clothes", but I must say it's just great. I may put a blasetr in it just ... because, but it's been a ball so far. It's not an exact copy of Alligator, it's more of an "homage", but I love it.

Good luck,
FrettyBoy
 #131874  by Cmnaround
 
Dude, don't waste your cash on a MIM strat. But a used Carvin. They are great guitars but have crappy resale value - so you can score one for $375-500 and maybe even one that is a neck thru. Check the guitar center used site. They will ship it for free to a store nearby. Carvins are kind of different when you want to change the wiring, but they are made really well and play great too.
 #131884  by vwjodyme
 
used carvin is a good idea too. I have a "wolf" carvin that I love that's why I was thinking of getting another.

eBay has a lot of unfinished ash bodies for fairly cheap, and necks seem to go for around $100. Is that opening a can of worms for someone with no experience in any sort of building or is that a good way to go?
 #131899  by strumminsix
 
vwjodyme wrote:Good thoughts strum. I was just thinking the carvin might be higher quality than a mim strat. Plus they offer it in swamp ash vs fenders regular ash.
Glad I helped!! I never said MIM but that would be the cheapest. I cannot hear the difference between swamp ash and regular ash. They sound as close as any 2 different boards do to my ears.

There was a lengthy discussion here on bolt on vs thru neck and some speculated that it played a part to the Alligator tone. Not saying I believe it but others certainly did.
 #131909  by Mr.Burns
 
I did exactly what you're proposing, I turned a Carvin Bolt kit into a custom Alligator. I just want to say that my project was a budgeted one because I already had the guitar in its stock form. However, the bottom line was just over $1k, so not a "poor man's Alligator" by any means, but still affordable. YMMV. It seems like others are trying to steer you away from the Bolt, probably with no actual experience with one. The kits are very high quality, not a low priced knock-off of their own product, which is what MIM strats are. I can say this with absolute certainty: Carvin's QC blows Fender out of the water, especially when comparing lower priced models. Just compare apples to apples and you'll see that for about what a good, new MIM strat costs(or maybe a little more) you can buy the Carvin kit and order what suits you, and it's MIA. Their electronics leave a little to be desired, but you'd be wiring a MIM anyway, so let's call it a wash on the pups and wiring. I chose to use the Schaller bridge that a few members have praised, but I believe the factory holes jive with Fender licensed hardware and replacement necks.

My point is, you couldn't pick a better starting point since you won't have to disassemble first, prep for refinishing, or anything except build it.

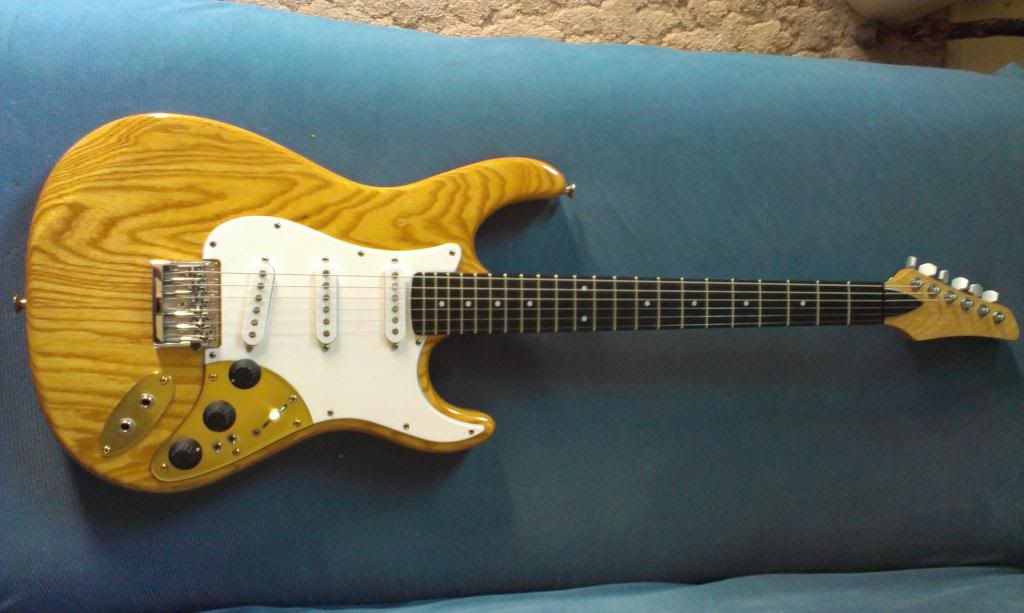
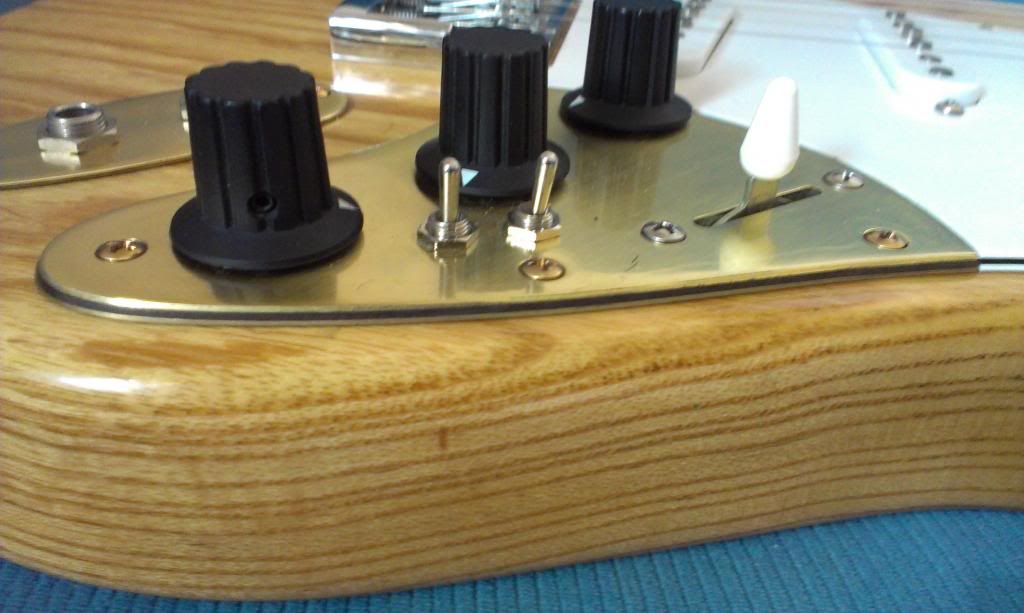
Anyway, here's mine. All credit for the oil finish goes to Brian@9mileskid(milobender on this forum), since he held my hand and walked me through the process via email. Also the beautiful laminated brass plate was made by Brian, the laminating was his idea, and boy was it a good one. It makes the guitar, IMHO. That's a layer of brass, then black walnut, then more brass. I know he's mentioned it elsewhere on this forum, maybe I'm not the only one here with one. DAllen VooDoo 69s, a DIY blaster, a Tiger preamp clone, and an ebony fret board make for a kind of Jerry tone "chameleon". It sounds great, btw. Sorry for the poor image quality, I've been meaning to get some good photos taken and post them for a long time, will do asap.
Image
Image
 #131911  by Mr.Burns
 
Thanks. I forgot to mention that I originally decided on this kit in 2005 not for this purpose but because I wanted a hardtail top loader and it was the cheapest way to accomplish that. I never painted it, it had a lousy tung oil finish that sanded off easily. Worked out nicely for an Alligator build when I got serious about wanting to own a decent guitar.
 #131925  by vwjodyme
 
The main thing I am worried about is the finish. Is it something as easy as picking up spray paint from a cabinet store or is it layers of different finish done with a spray gun?
 #131931  by AlabamaDidn'tGetAway
 
vwjodyme wrote:The main thing I am worried about is the finish. Is it something as easy as picking up spray paint from a cabinet store or is it layers of different finish done with a spray gun?
Natural is about one of the easiest finishes ever. Get some dewaxed shellac flakes from shellac.net. Mix up a batch to the shade you want. Keep it thin, and then just wipe it on. If minimal color is required you can use Bullseye dewaxed sanding sealer straight out of the can.
Image
Image
Then topcoat with Minwax clear laquer in a spray can.
Image
Heres a pine tele.
Image
Heres a pawlonia wood tele with just shellac. I didn't bother to clear coat it. I din't bother to grain fill it either, so it has a grainy texture. I dont care, I was going for a fast relic anyway.
Image
For a professional smooth finish, if you use an open pore wood like ash, you should grain fill first. With a tighter grained wood like pine or alder its not necc to grain fill.
 #131932  by Sparechaynge
 
Danish Oil is a nice finish too. It's a process similar to what Alabama described, except you don't have to mix anything. It's probably not great if you sweat a lot while playing, but it's very easy to apply and looks like a well-aged clear coat after a few weeks. I have had good luck with Watco, but they are all very similar.
 #131933  by AlabamaDidn'tGetAway
 
The pine tele was about 10 thin coats of shellac flake/denatured alcohol in aprox 3/4 blonde and 1/4 garnett. Sample sized packs from shellac.net. applied with a rolled up clean white cloth.
The laquer is trickier. You need at least 3 cans from Walmart at about $6/can. Use a ventilator, the stuff is toxic. Spray outside on a nice day between 50 and 75 deg. Put on a thin coat, let dry for an hr, do another, let dry for an hr, do one more and let it rest for at least a day, then repeat. Then repeat again, by then you should about go thru the 3 cans. For a thicker finish, get another can and do it again. Then let it cure for at least 2 weeks, a month is better. Then start wet sanding with a block CAREFULLY, with 800 grit, proceeding on up to 2000 grit. Be careful, sand lightly in opposite directions each time don't dand thru. Once all sanding swirls are gone, you can polish with McGuires polishing compound and wax.

The palownia tele was just 10 coats of the Bullseye sanding sealer, the a couple of coats of some garnett flake mix for the final color to darken it just a bit.

Of course there or other ways to skin this cat, thats just how I did it and it works.
You could use stain for color, then seal with sanding sealer, and topcoat with wipe on poly if you wanted too. Id prob go at it like this
Sand body to 200 grit(always start here) no finer, 200 grit is just right.
1 coat sanding sealer
Grain fill
1 coat sanding sealer so stain will apply more evenly
Stain
1-2 coats sanding sealer
Apply wipe on poly